


Sourdough recipes have been all the rage since the pandemic. I tried my hand at it when we were all stuck at home and I have to tell you it was discouraging. Maybe you’ve been there. You’ve tried making your own starter and following all the directions, tricks, and tips, but you just haven’t had luck. Enter The Beginners Guide to making Dutch Oven Sourdough Bread.
Please note that if you purchased some of my starter- Sammy the Starter from Swan Dale Sourdough Co. make sure you put him in a bigger jar and feed 50 g. of bread flour and 50 grams of water. 🙂 Then read on before making your first loaf!

This easy sourdough bread recipe will give you the basics so that you can then build on your sourdough baking knowledge. I am going to take you through all the stages and while I’ll admit it takes a little time, once you have the method down, you’ll find this to be a relaxing and even fun way to feed your family.
Health Benefits of Sourdough Bread
Sourdough has plenty of health benefits, the least of which is not the fact that it is a fermented food. Fermented foods are excellent for your overall gut health. Sourdough is rich in nutrients, less likely to spike your blood sugar and it is even lower in gluten than bread made with commercial yeast. Friends of mine who find themselves to be gluten intolerant, have no issue enjoying sourdough.
If you actually suffer from Celiac disease, be cautious, but it might be something you can enjoy if it is fermented for a long time. The fermentation process will actually decrease the gluten.
Bottom line, if you are looking to remove chemicals from your diet, sourdough couldn’t be better. It is literally made of flour, salt and water. You can’t get anymore pure than that! So, now that you are intrigued by the health benefits, let’s get you baking healthy delicious bread for your family!
How to obtain a sourdough starter (You can make it, but I don’t recommend it for beginners)
The reason I gave up the first time was I tried to make my own starter. Making your own starter is dependent on such a variety of factors. Literally the air inside your house can determine whether your starter will get going and begin to ferment.
I tried and tried to get things to happen and it just wasn’t. About a year after that a friend brought me a starter that was 10 years old and super strong. She gave me simple instructions on how to feed it and BOOM I was making homemade bread within a day or 2.
If you live in my area, you can purchase some of my starter. Sammy is available for purchase and you can find me at Swan Dale Sourdough Co. on Facebook!
So, my recommendation is that if you have a friend who already makes sourdough, get some from them. If you don’t, you can order dehydrated starter. That is if you are too far away from me 🙂 I purchased one myself and had excellent results with it. I recommend purchasing “Eve” from Southern Sourdough Co. I’ve linked you here and you should definitely follow her Tik Tok or Instagram. She has excellent advice on all things artisan sourdough bread.
Name Your Starter!
Eve is the name of her starter. Yes, you get to give your starter a name. Think of it as your little pet. It truly is a living organism after all! My friend gave her’s the name Eduardough. I named mine Sammy. Sammy the Starter. Get creative and have fun with this!
Eve comes with instructions and as you can see from the review on Etsy, people have fantastic luck with her. So yes, while you might be super proud of yourself for making your own, for best results at the beginning- get you a strong starter to begin your journey.
Feed. Discard. Active. Inactive. What is an “active starter” ?
These are probably terms you’ve read and just glazed over at the thought of trying to figure it out. How can bread dough be so complicated? Well, it’s not, but just like any new venture, you have to start speaking the language.
I am going to try to define this and keep it super simple for you.
Active Sourdough Starter: This is starter that has been fed flour and water and is bubbly and ready to bake with.


Active starter is bubbly. You can hear it. It almost sounds like rice crispies!
Inactive Sourdough Starter: This is starter that needs to be fed. It will be deflated, not very bubbly and will not be ready to bake with.
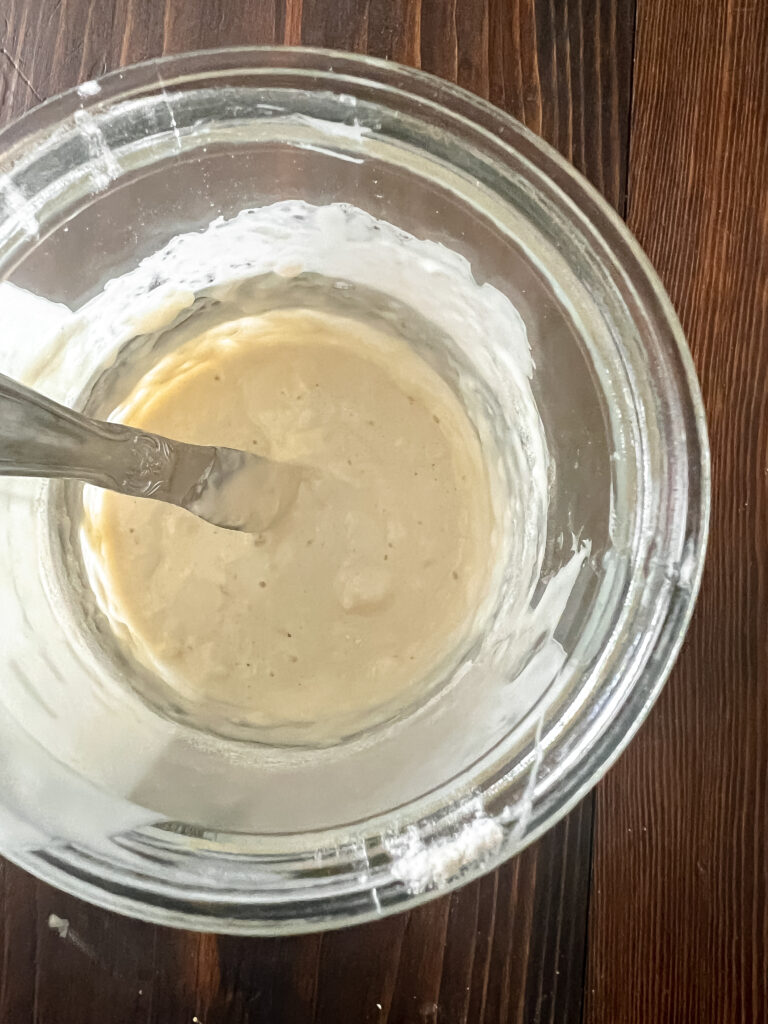

Unfed starter prior to feeding. Flat and not as bubbly.
Feeding : When you feed your starter, you simply give it flour and water.
Discard: Another confusing concept, but it is just inactive starter. Remember you are adding flour and water to your starter so if you don’t use all the starter, you need to discard some. How much starter your keep determines how much you feed (sort of! I’ll get to that later).
You don’t actually have to “discard” it though. You can make pancakes, muffins, crackers and all sorts of things. So, I like to keep a jar of discard for this purpose. I also keep a jar of starter because if something happens to the one I’m keeping, all I need to do is feed it again and voila!
You can also give discard to friends. Remember it’s just inactive starter, so all they will need to do is feed it and get to baking. This is what my friend did for me!
How to Feed Your Sourdough Starter
There are a lot of ways people feed their starters. If you do research you’ll probably feel more confused than when you started. I’m going to give you the exact instructions/advice my friend gave me. It has been working for me for 2 years plus! If you have heard other things, awesome. I’m sure they work for someone too. Bread and baking in general is very specific to the environment.
Fridge Store Your Starter-it’s EASIER
I should note that I do not keep my starter on the counter at room temperature as many do. I want this to be low maintenance so I keep it in the fridge and feed it once to 2 times per week whether I’m baking with it or not. This keeps it “alive” and it’s ready to bake with after I feed it.
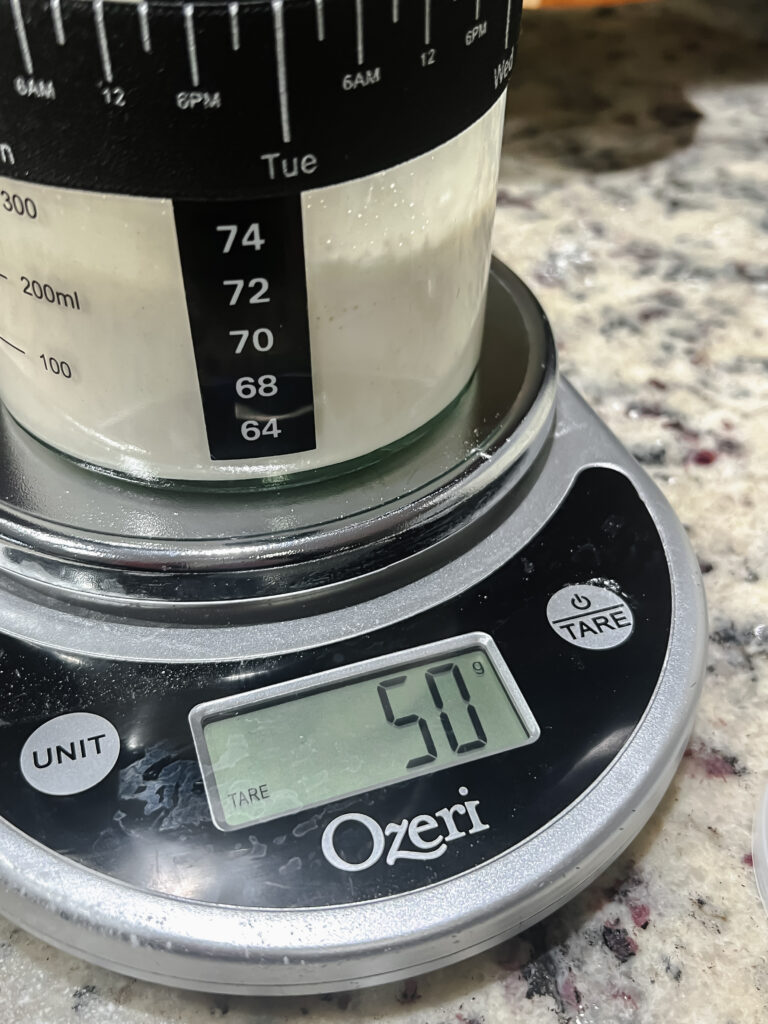
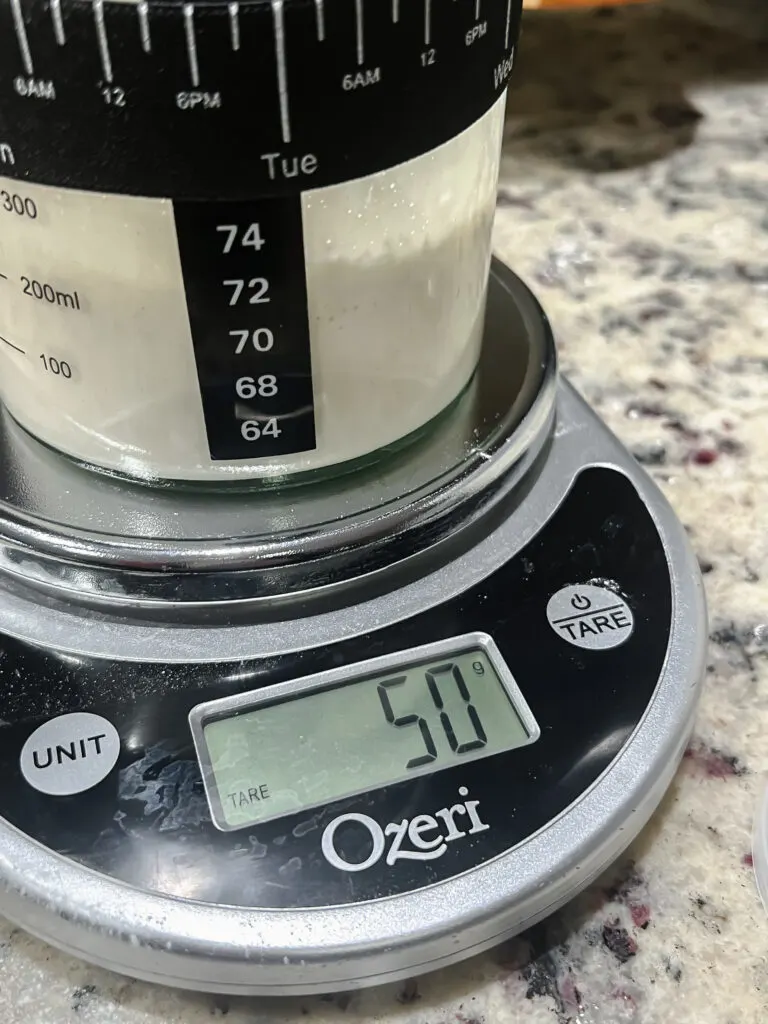
I keep 50-100g of starter in my jar. Now, this is approximate. I use a scale to feed it, but I don’t obsess about it and the good news is, you don’t have to! I go with 1:1:1 ratio so I feed 50 grams of starter with 50 grams of water and 50 grams of flour. If I have 100g. of starter- I feed with 100g of flour and 100g of water. You really can’t mess this up unless it is WAY off.
Feeding sourdough starter.
The process looks something like this.
- Know what your jar weighs empty. You’ll put your jar with the starter in it on the kitchen scale and subtract the weight of the jar to know how much starter is in there. So, if your jar is 300g and you have 100g of starter, then your jar will weigh 400g.
- If you have 100g of starter, you’ll be feeding it 100g of water and 100g of bread flour. So, after you put your jar on the scale, hit the tare button and add the water and the bread flour.
- Stir it together.
- Loosely cover it. You want air to get into it, but don’t leave it uncovered to form a crust.
- Wait about 6-8 hours. This is average. Some people put theirs in an oven with the light on to expedite their starter becoming active. Temperature is everything. If your house is cold, it might take 8 hours. If it’s a hot humid day then it might take 3-4.
When your starter looks bubbly and has doubled in size it is ready to bake with! Another test you can do is the float test. If you add a little to a glass of water and it floats, it’s also ready to bake with. Notice I’m saying to use bread flour here. You want that higher protein content in your flour so you can build a strong starter. You’ll talk to people who use all purpose flour, but again, this is what has worked for me, so use the bread flour.
I’ll review brands of flour I like best at the end of this post.
When do I discard? How Much?
Discard is probably the thing people become hung up on the most. I’m here to assure you that you don’t need to panic about it.
I typically keep 50-100g of starter in my jar. I usually discard down to that each time. So, if I make bread and still have say 150g of starter. I’ll discard 100g.
But I don’t usually throw it away. I’ll often use it in another recipe. There are TONS of recipes for waffles, pancakes, crackers, pizza dough- the possibilities are endless.
Alternatively, remember that discard is just inactive starter. You can gift it to a friend and if they feed it , they now have a starter as well!
Don’t obsess about it though. Just feed at those 1:1:1 rations of starter-water-flour and it’s FINE! There may be instances where you want more starter on hand to make additional loaves. Did I mention sourdough freezes beautifully?
So, do not obsess about discard-it’s really not as exact and crazy as you’d think if you have a strong starter. it’s definitely more important if you are making your own starter, and we aren’t going to do that because we are beginners 😉
Let’s make Dough for Dutch Oven Sourdough bread
Now you have an active starter. Yay! You’ll feel accomplished based on this fact alone! You are honestly halfway there! It’s time to mix your dough. Using your kitchen scale, you’ll add bread flour, water, salt and active starter to your large bowl.
You will mix it using a dough whisk or a wooden spoon. What you’ll have is a shaggy dough. It won’t look impressive. It’s fine! Cover it with plastic wrap or a disposable shower cap. I like to use the shower caps because you don’t have to worry about them clinging.
Let the dough rest for 1 hour before you perform the first set of stretch and folds. So, what is a stretch and fold? It is the sourdough version of kneading. You are literally helping to create the gluten structure by pulling the dough up from the bowl and stretching it over itself.
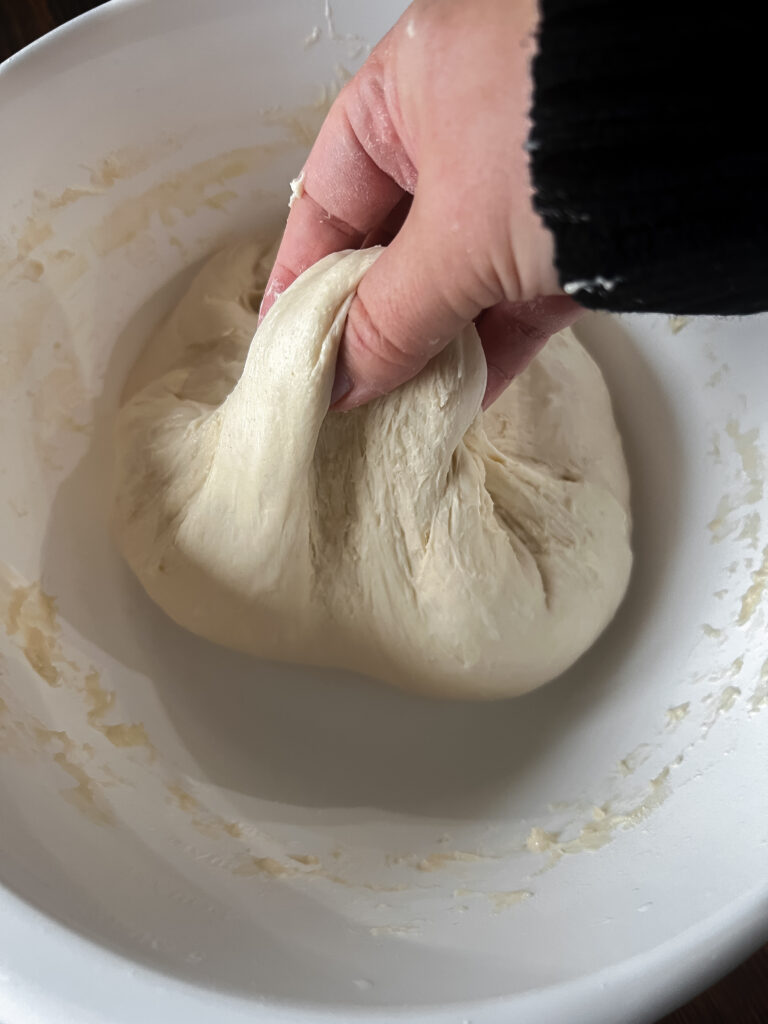

Pull dough up to stretch.
As you go through 4 sets of stretch and folds. You’ll find your dough becomes soft, stretchy and bouncy. Your first set will be your stickiest. Wet hands will help you ! Just wet your hands before performing the stretch and folds.

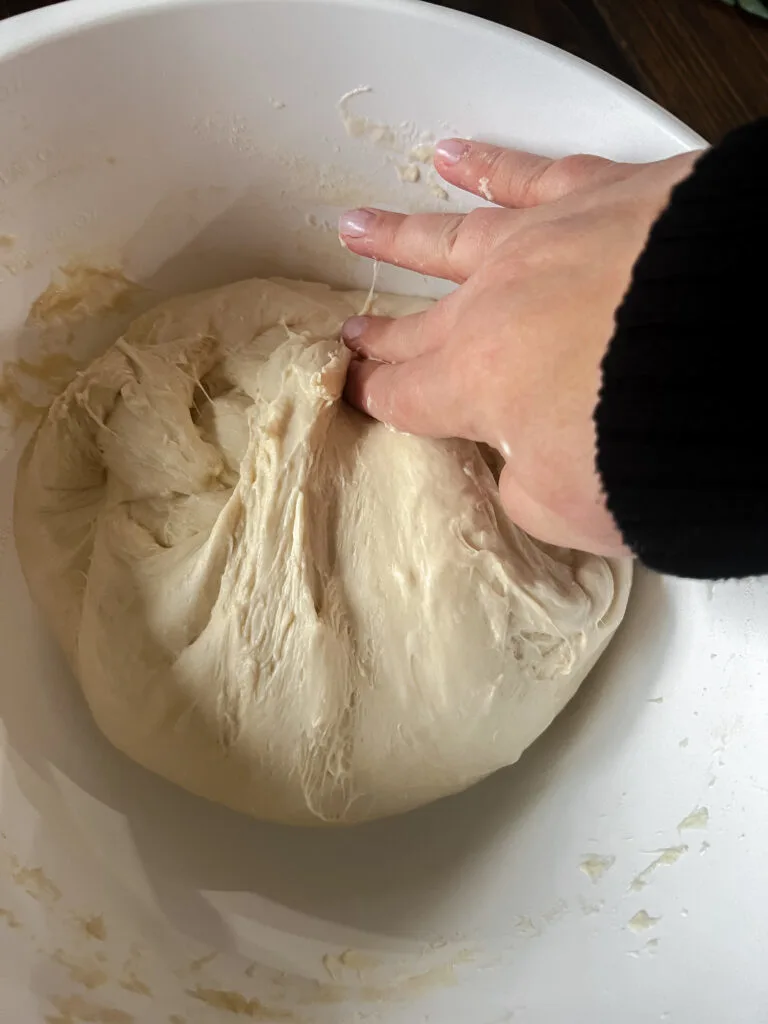
Fold Dough Over itself
Below is a schedule:
- After 1 hour do the first set of stretch and folds. You’ll do about 20-25 stretch and folds. Simply work your way around the dough ball until you’ve stretched and folded it over itself several times (about 20-25 to be exact – ish)
- Hour 2- do another set of stretch of folds. This time just work your way around the bowl once time and do about 4-6.
- Hour 3- repeat.
- Hour 4- repeat, but at this point you should have a smooth and bouncy dough ball. You’ll turn it smooth side up. Cover it with your shower cap or plastic wrap. I even add a towel for good measure.

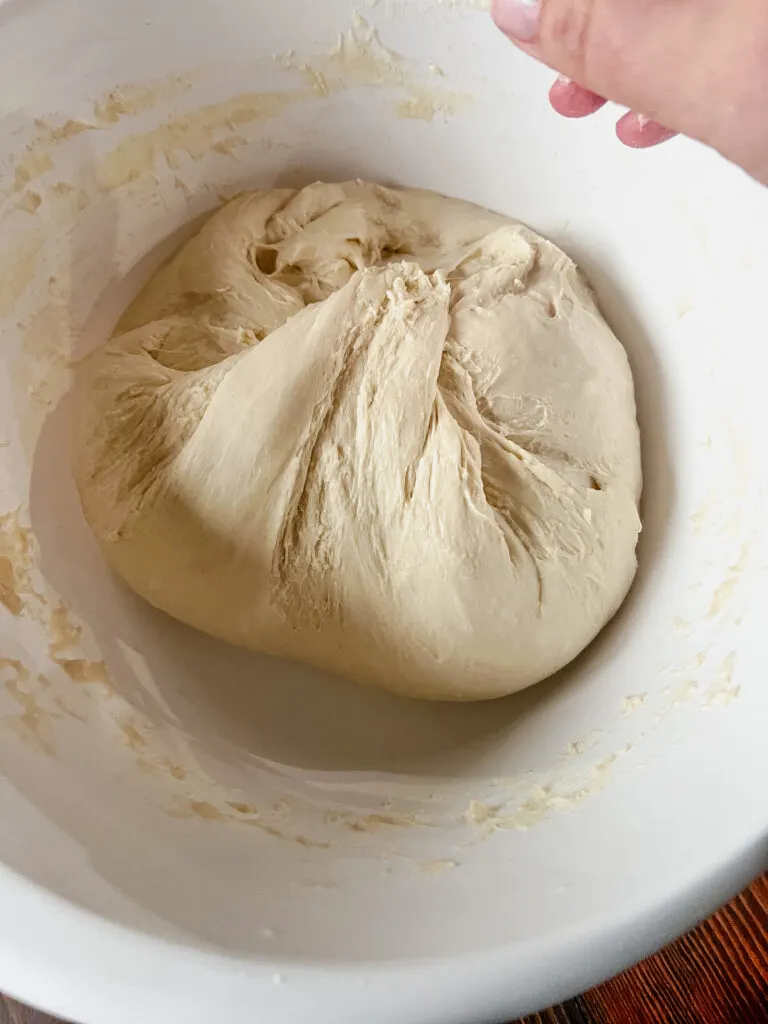
Freshly stretched and folded dough. The dough will be in a tighter ball afterwards and then will relax over the course of an hour.
Congratulations you’re ready for the bulk fermentation phase.
What is bulk fermentation?
Bulk fermentation is the first dough rise. Think of it as the first rise in any yeasted recipe! All it means is that the dough is left alone for a long period to ferment. My bulk fermentation takes 6-8 hours. Once again this is dependent upon the temperature of your home.
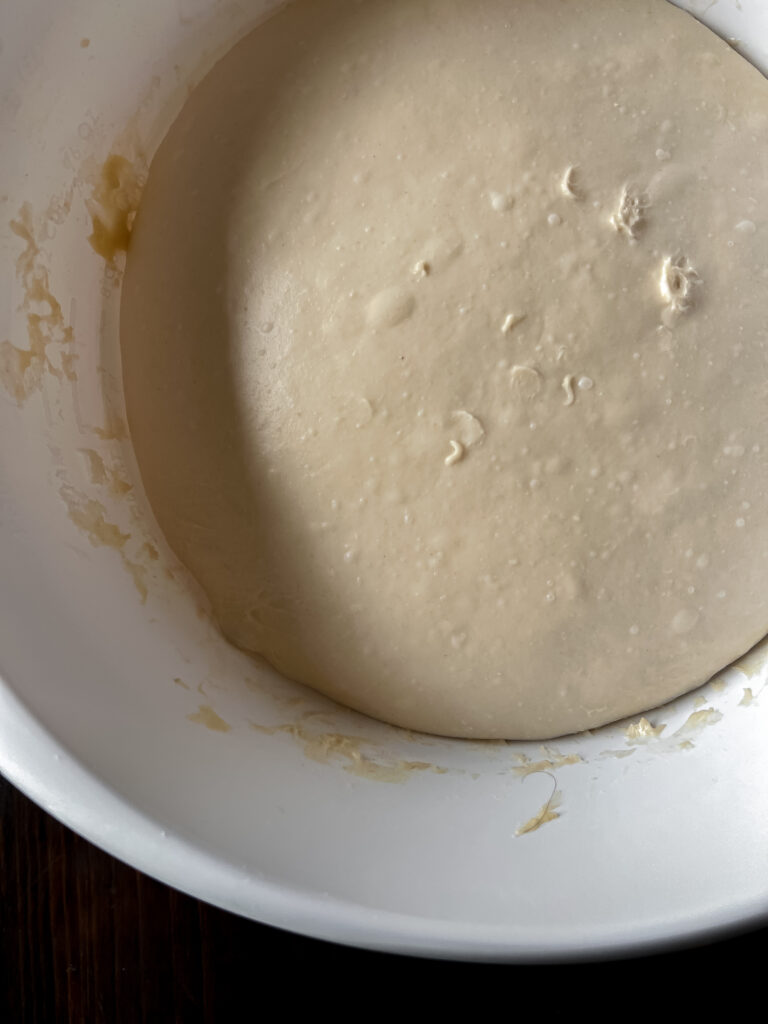

Bulk fermented dough will be smooth on top and bouncy when touched.
In winter time or if you run your air conditioner cooler in the summer, bulk fermentation on your counter over night will work best, but I recommend doing this during the day until you figure out how it goes. Overproofed bread won’t bake up nicely.
If your house is warmer and less temperature controlled, then this method might be too long for you. I provide 2 baking schedules below. Choose the one best for the climate of your home.
Yes, this is a process. You’ll start it one day and you won’t be baking until the next day. Sourdough is slow food!
Baking/Fermentation Schedules for Sourdough Bread
Schedule One- Overnight Bulk Fermentation (Works best in chilly conditions under 68 degrees)
- 9AM: Take starter out of fridge and leave on counter for 1 hour.
- 10AM: Feed Starter
- 3-4 PM or whenever the starter shows that it is bubbly, about doubled in size and floats in a glass of water- mix your dough.
- 4-5 PM- first set of stretch and folds (remember 20-25 this first round. 4-6 is fine the rest of the times)
- 6PM-2nd set of stretch and folds
- 7PM-3rd set of stretch and folds
- 8PM- 4th set of stretch and folds
- after 8 PM stretch and fold-turn dough smooth side up and cover for the night to bulk ferment.
- 5AM you will shape your dough. Place it in the fridge for 4-12 hours to ferment. The longer it’s refrigerated the better it holds shape and the more classic “sour taste” you get!
Schedule Two (Daytime bulk ferment)-best in conditions over 68 degrees.
- 9PM- feed room temperature sourdough starter.
- Leave overnight on the counter loosely covered to activate. Your house needs to be moderately cool to do this.
- 5-6AM- Mix up your dough.
- 7AM- first set of stretch and folds
- 8AM-second set
- 9AM-3rd set
- 10AM-4th set then turn dough smooth side up to bulk ferment. Make sure you cover it with plastic wrap.
- 3-5 PM your dough should have come to about 75% in size or almost doubled. Watch it because if your house is hot this will happen sooner. This daytime schedule allows you to monitor it closely.
You can now shape your dough. Unless you like to stay up really late, you will put this dough into the fridge over night and bake the following morning.
Shaping Your Sourdough
Okay congrats! You’ve made it to shaping. This is my favorite part. It’s just so therapeutic. Your fermented dough should be bouncy and not too sticky. You’ll need a lightly floured surface to work with it. You don’t want to be adding a bunch of flour into it.
For the dutch oven, we shape a round boule shape. Very easy. I promise.
Unlike yeasted dough, you don’t want to be handling it a bunch . You’ll notice there are bubbles in your dough. You don’t want to deflate them entirely, but you do want to enough that you get a nice shape to your dough.
You’ll start by dumping your dough onto a lightly floured surface. Using a bench scraper, you’ll move the dough from bowl to counter in a gentle fashion. You’ll be amazed how you can see the beautiful gluten strands that have developed.
When you get the dough onto your work surface, you’ll spread it out into a loose rectangle gently deflating the bubbles a bit. You’ll then fold each side into the middle. Then you’ll roll it up from the end into a ball. After that you’ll turn the dough by running your hands over the top then underneath and bringing it towards you into a tight ball. If you are a more visual person, there are tons of videos on this. And once again, your bread will come out even if you don’t do this part perfectly.
You’ll get a feel for it as you go. Basically you want to end up with a tight pretty ball.
Final Proofing- then yes we will finally bake it!
You’ll take the ball and turn it bottom side up (yes the smooth side will rest on the bottom of the bowl) into a bowl or colander lined with a rice flour dusted flour sack towel OR a banneton dusted with rice flour . You need to use rice flour specifically because it won’t get gummy or allow your dough to stick. This is important. Regular flour gets gummy and will effect the quality of your crust.
Cover your bowl or banneton with plastic wrap or a shower cap (love those) and rest it in the fridge for a minimum of 3 hours and a max of 24 hours. You can proof on the counter, but you cannot let things go for longer than a few hours or your dough will over proof. This is the stage where your sourdough get it’s “sour” flavor. The longer it spends at this stage, the more you get that sourdough flavor.
I do the fridge for safety. Yes, you will find that people will say they have final proofed for up to 3-5 days in the fridge. I have not tried that myself so I cannot recommend it.
When your dough comes out of the fridge, it’s time to bake!
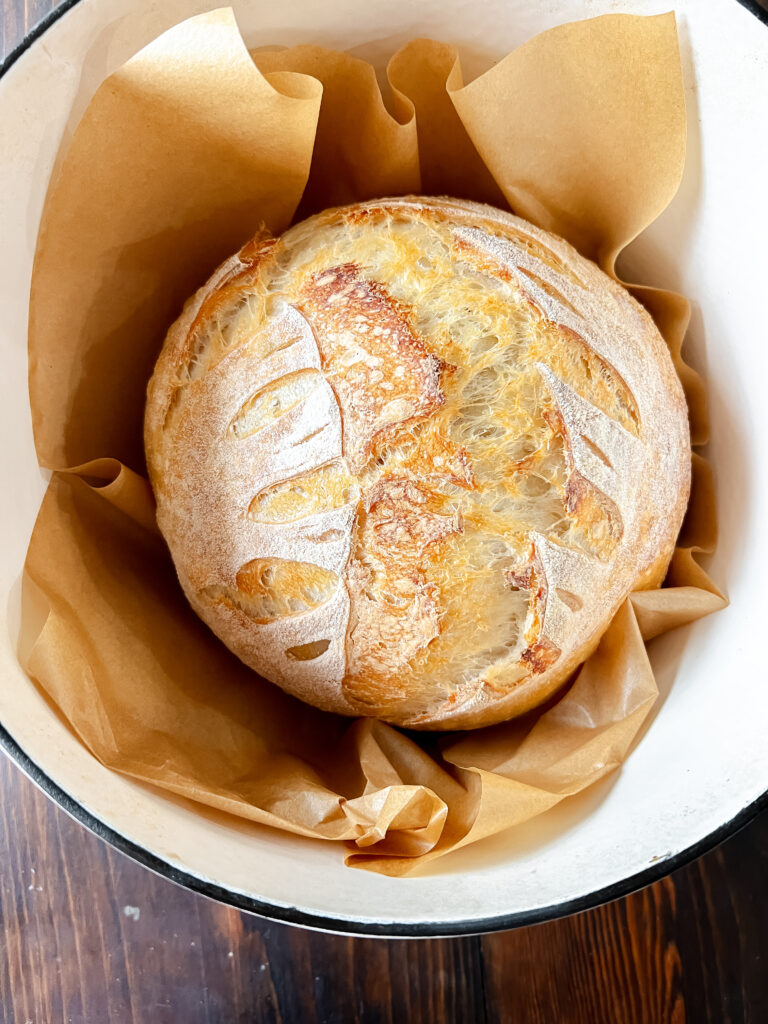
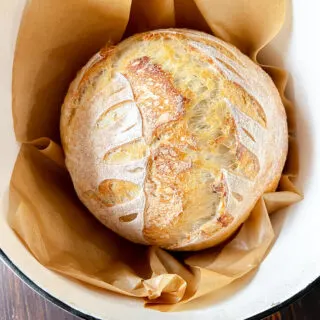
Scoring and Baking Sourdough Dutch Oven Bread
If you are still here, then awesome! You have the patience for sourdough baking! Scoring is fun and I recommend a razor blade for this. You can use a sharp knife (like a small paring knife) too. I did until I started investing in things to make this easier.
Turn your dough on a piece of parchment paper smooth side up. I use unbleached. Using your razor blade or knife put a cut down the center about a 1/2 inch through. This will allow the gasses to escape and your dough to rise in the oven even more. Sourdough has an amazing oven rise when it bakes.

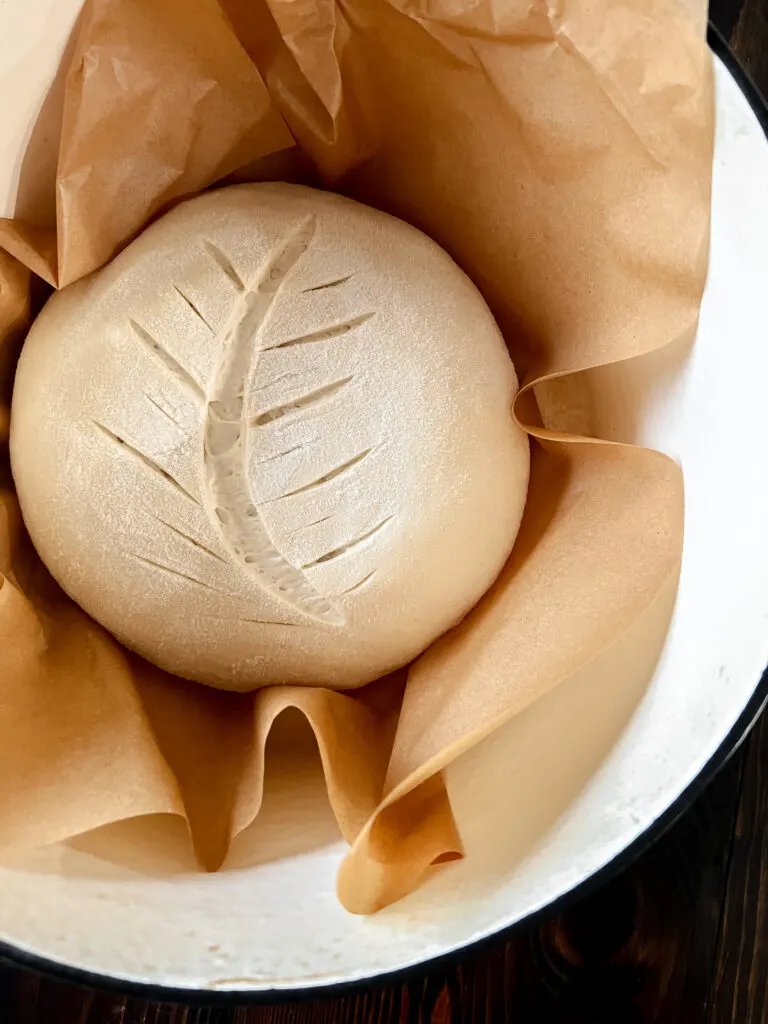
Scored dough. The first cut is down the middle and about a half inch deep. The ones on the sides are more shallow and purely for decoration.
You will get fancier with this. You can watch videos all day on scoring, but remember as a beginning point, we just need the basics! You need a decent cut down the middle. That’s it!
Place your scored dough-parchment and all into the dutch oven and put the lid on. I do what is called a “cold bake.” This means there is no preheated dutch oven. Place it in the oven and bake at 425 degrees for 55 minutes. You set the timer when you place it in the oven. You will NOT preheat your oven at all.
So , you will place bread in dutch oven, place in oven, turn oven to 425 and set a timer for 55 minutes.
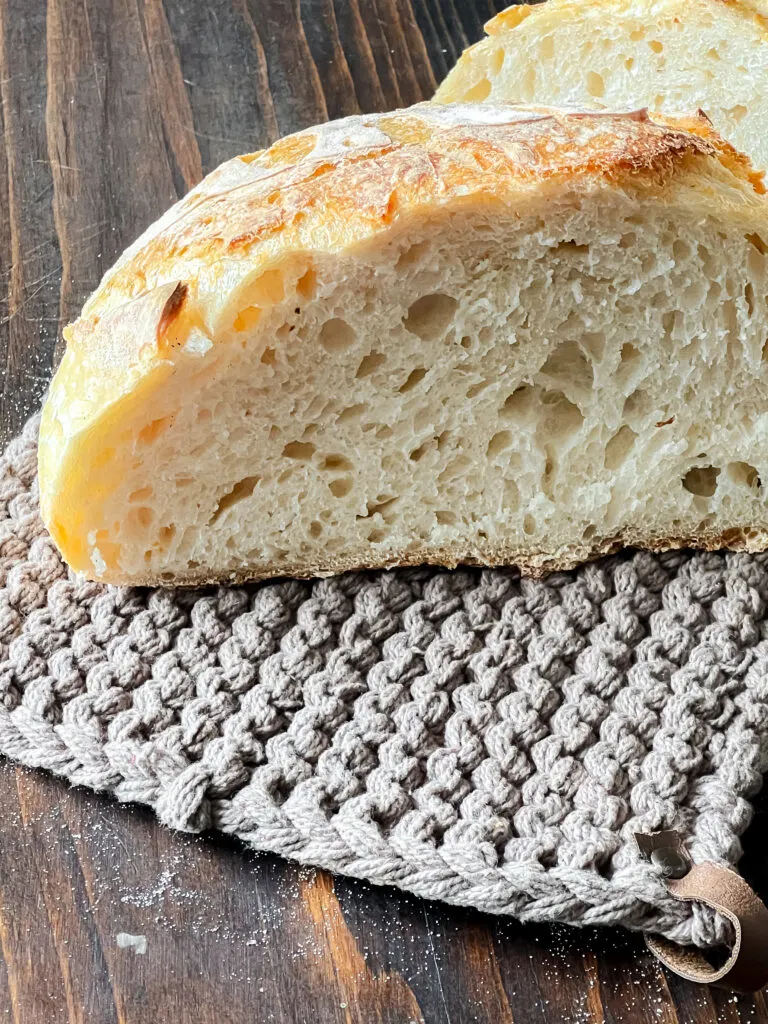
This is so easy and I find my crust is perfect every time without being so crunchy I cannot cut through it.
After 55 minutes move your bread to a cooling rack and let it sit for 2 hours before cutting into it.
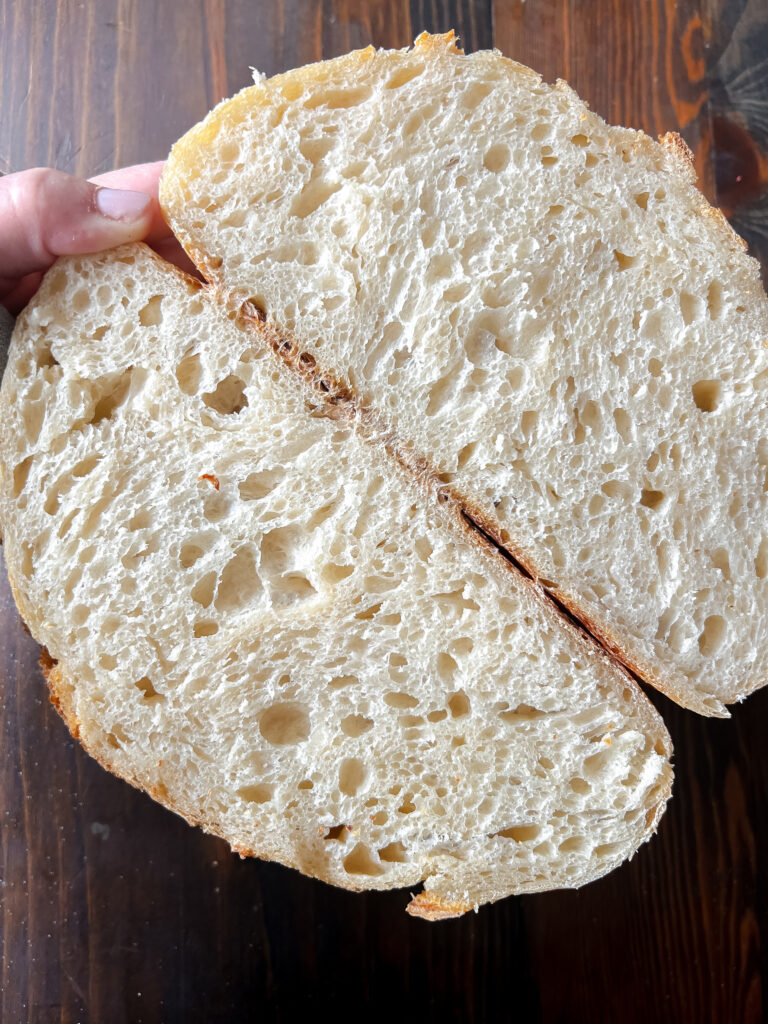

Notice the inside is a crumb that has some holes and variations. This is light and airy in the center. It should not be dense.
Admire your beautiful, risen and crusty loaf!

The Beginners Guide to making Dutch Oven Sourdough Bread- Equipment List and Links
Flour- My absolute favorite is King Arthur Bread Flour. If I can’t find that, I will use White Lily Bread Flour. UPDATE to this post: Costco has a flour that’s PERFECT and at a great price if you are doing a lot of baking. The Organic all purpose flour is 11.7% protein and works fabulously!
Banneton, dough whisk, lame and bench scraper set– I have this set. It’s affordable and you can get it right on Amazon!
Flour Sack Towels: I love these because the dough doesn’t stick to them. There is no lint produced so they are perfect for lining bowls and covering your bread up.
Dutch Oven: This doesn’t have to be expensive. Lodge Brand has never failed me!
Kitchen Scale: This one is highly reviewed and very affordable. I’ve had mine for a few years now!
Parchment Sheets: These are unbleached and come in a large pack. You’ll have plenty of parchment for your baking needs.
Disposable Shower Caps: I like these instead of plastic wrap. The stretchy band is just easier when you are covering and uncovering your dough for stretch and folds.
Jar with a lid. I like a mason jar or you can search Amazon for jars for starter. Weck jars are also popular. You should be able to loosely fit the lid. Jar should be a minimum of 16 ounces for good measure.
Okay that should cover it. The only items you can’t live without here are the jar, dutch oven, parchment and kitchen scale. Everything else has a replacement with things you probably have around your kitchen.
Note that I am an Amazon Associate. Some links here are affiliate links where I earn a small commission. That commission helps me to provide you with free content. I appreciate it when you use my links to purchase!
The Beginners Guide to making Dutch Oven Sourdough Bread
I hope you found this guide comprehensive. It’s my longest post yet by far, but I hope it provides you with everything you need to be confident int your sourdough abilities! Please leave a star rating and review. Remember that if at first you don’t succeed, try again.
Bread making is rewarding, fun, relaxing and above all it is better for your family. Did I mention it is also cheaper than purchasing bread at the store? Once you have the equipment and the know-how you’ll be turning out all kinds of things with this one jar of fermented gold- your sourdough starter. Happy Baking!
Once you master the basics- you’ll want to make more- trust me! Here are the sourdough sites I trust the most!
Pin it for Later!


The Beginners Guide to making Dutch Oven Sourdough Bread
Ingredients
- 50 grams Active Fed Sourdough Starter
- 350 grams Water Use filtered water. Tap water will have chlorine and can kill your starter.
- 500 grams Bread Flour King Arthur brand recommended.
- 10 grams Salt I used kosher salt.
Instructions
- PLEASE MAKE SURE you refer to the post headings for exact instructions and questions. They provide a much higher and necessary level of detail. This section will simply review steps.
- Feed your starter. About 6-8 hours later it should be active and ready to make dough.
- Mix together starter and water in a large bowl. Make sure you are using a kitchen scale. Place the bowl on the scale and hit the tare button. Pour in starter. Hit tare again and add water. Mix together to combine.350 grams Water, 50 grams Active Fed Sourdough Starter
- Hit the tare button again and add flour. Hit the tare button again to add and measure the salt. Mix together until you have a shaggy dough.10 grams Salt, 500 grams Bread Flour
- Allow the dough to sit covered with plastic wrap for 1 hour and then perform your first set of stretch and folds. You'll perform 20-25 this first time. Work your way around the bowl and pull sections of dough up from the outside and fold it in on itself.
- Cover and wait another hour. Perform stretch and folds again. This time 5-6 is plenty.
- Perform 2 more sets (for a total of 4) spaced about an hour apart. This doesn't need to be totally exact, but an hour is good.
- After stretch and folds are completed, you'll cover the dough after turning it smooth side up. Leave to bulk ferment for 6-8 hours. The temperature of your home is crucial. See post above for details.
- After bulk fermentation shape the dough into a round boule shape. Turn it into a bowl lined with a towel (dust towel with rice flour) or a banneton if you have it. Make sure to dust the banneton or the towel with the rice flour to prevent sticking. Refrigerate for a minimum of 3 hours and a max of 24.
- Remove from the refrigerator and turn dough onto parchment smooth side up.
- Score the dough with at least one cut down the center about a 1/2 inch. This is to allow gasses to escape and to get a good oven spring.
- Take the dough on the parchment from the counter into the dutch oven. Place the lid on and place it in a cold oven. Turn the oven to 425 and bake for 55 minutes. You will NOT preheat the oven or the dutch oven. This is known as a cold start.
- After 55 minutes move the bread off the parchment from inside the dutch oven and place on a cooling rack for at least 2 hours.
- Do not store warm bread. Make sure you allow it to cool completely before wrapping in foil or parchment and placing in a zip top bag. This will keep 2-3 days on the counter or you can freeze it!
Tina
Monday 29th of January 2024
you said you’d talk about the discard later, but i didn’t see it in the post?
Krysten
Tuesday 30th of January 2024
I will clarify that more in the post! You are right! This was such a huge post-haha. So, what I meant here was I always keep 50-100 g of starter. So I'll discard so that I have that each time. So, let's say I make bread after feeding and I need 50g for my bread, but I have 150g in my jar. I'll discard down to 100 or 50g. Now, I don't throw the discard away usually. I will gift it to friends or make things like waffles, pancakes or something. Discard is just inactive starter. It can be reactivated, tossed or used in other recipes that can use inactive starter. A simple internet search will give you TONS of ideas for discard!